Installing plugins
Install, update, uninstall, and purge marketplace-managed plugins.
Updated
For customers and operators, plugins reach Railbase through one path: the built-in marketplace. Railbase pulls a signed, encrypted bundle from railbase.app, verifies it, stores it in your Vault, and runs it inside the core only while its license permits it. There is no upload-from-disk flow, no sideloading, and no plugin binary to start.
Note
Railbase also has internal development and embedder hooks used to build and test plugins with the core. Those hooks are not a customer install path and are not how commercial modules are distributed.
Frontend: the plugin's user-facing pages
A marketplace install wires the backend (collections + verbs) and the
user-facing screens together. The UI lives inside the plugin bundle as
bundle/manifest.json (manifest.ui.pages: pages + widgets bound to the
plugin's own verbs), and the core's site shell mounts it at /<slug> on the
site SPA (/), never the admin panel. There is no codegen, no rebuild, and no
wizard — one marketplace action delivers backend, schema and UI together.
Note
The old railbase plugin setup <slug> codegen wizard — which wrote raw TSX
into a site's web/ and required a rebuild — was removed 2026-06-17; it
never fit the data-resident model. A plugin may keep a self-contained
frontend/ TSX module as the design source for a richer hand-built UI, but
the shipped + mounted source of truth is the bundle manifest. Legacy
widgets.json files are compatibility artifacts, not the customer install
contract.
On install the plugin's pages appear at clean /<slug> URLs — public pages open,
app-user pages behind the site's sign-in gate — with collision/reserved-prefix
checks at install and only license-enabled plugins' UIs served. (On a
multi-tenant instance, a signed-in app user who isn't a member of any tenant is
shown a "no tenant" page rather than the plugin UI — see the membership gate in
Data & multi-tenancy.)
Note
Each widget calls the plugin's own /api/<slug>/… verbs with the same app-user
session the site already manages, and tenant-scoped pages include the tenant
context. Every verb still enforces auth + tenant scope on the server. The
manifest only names the verbs; it grants nothing.
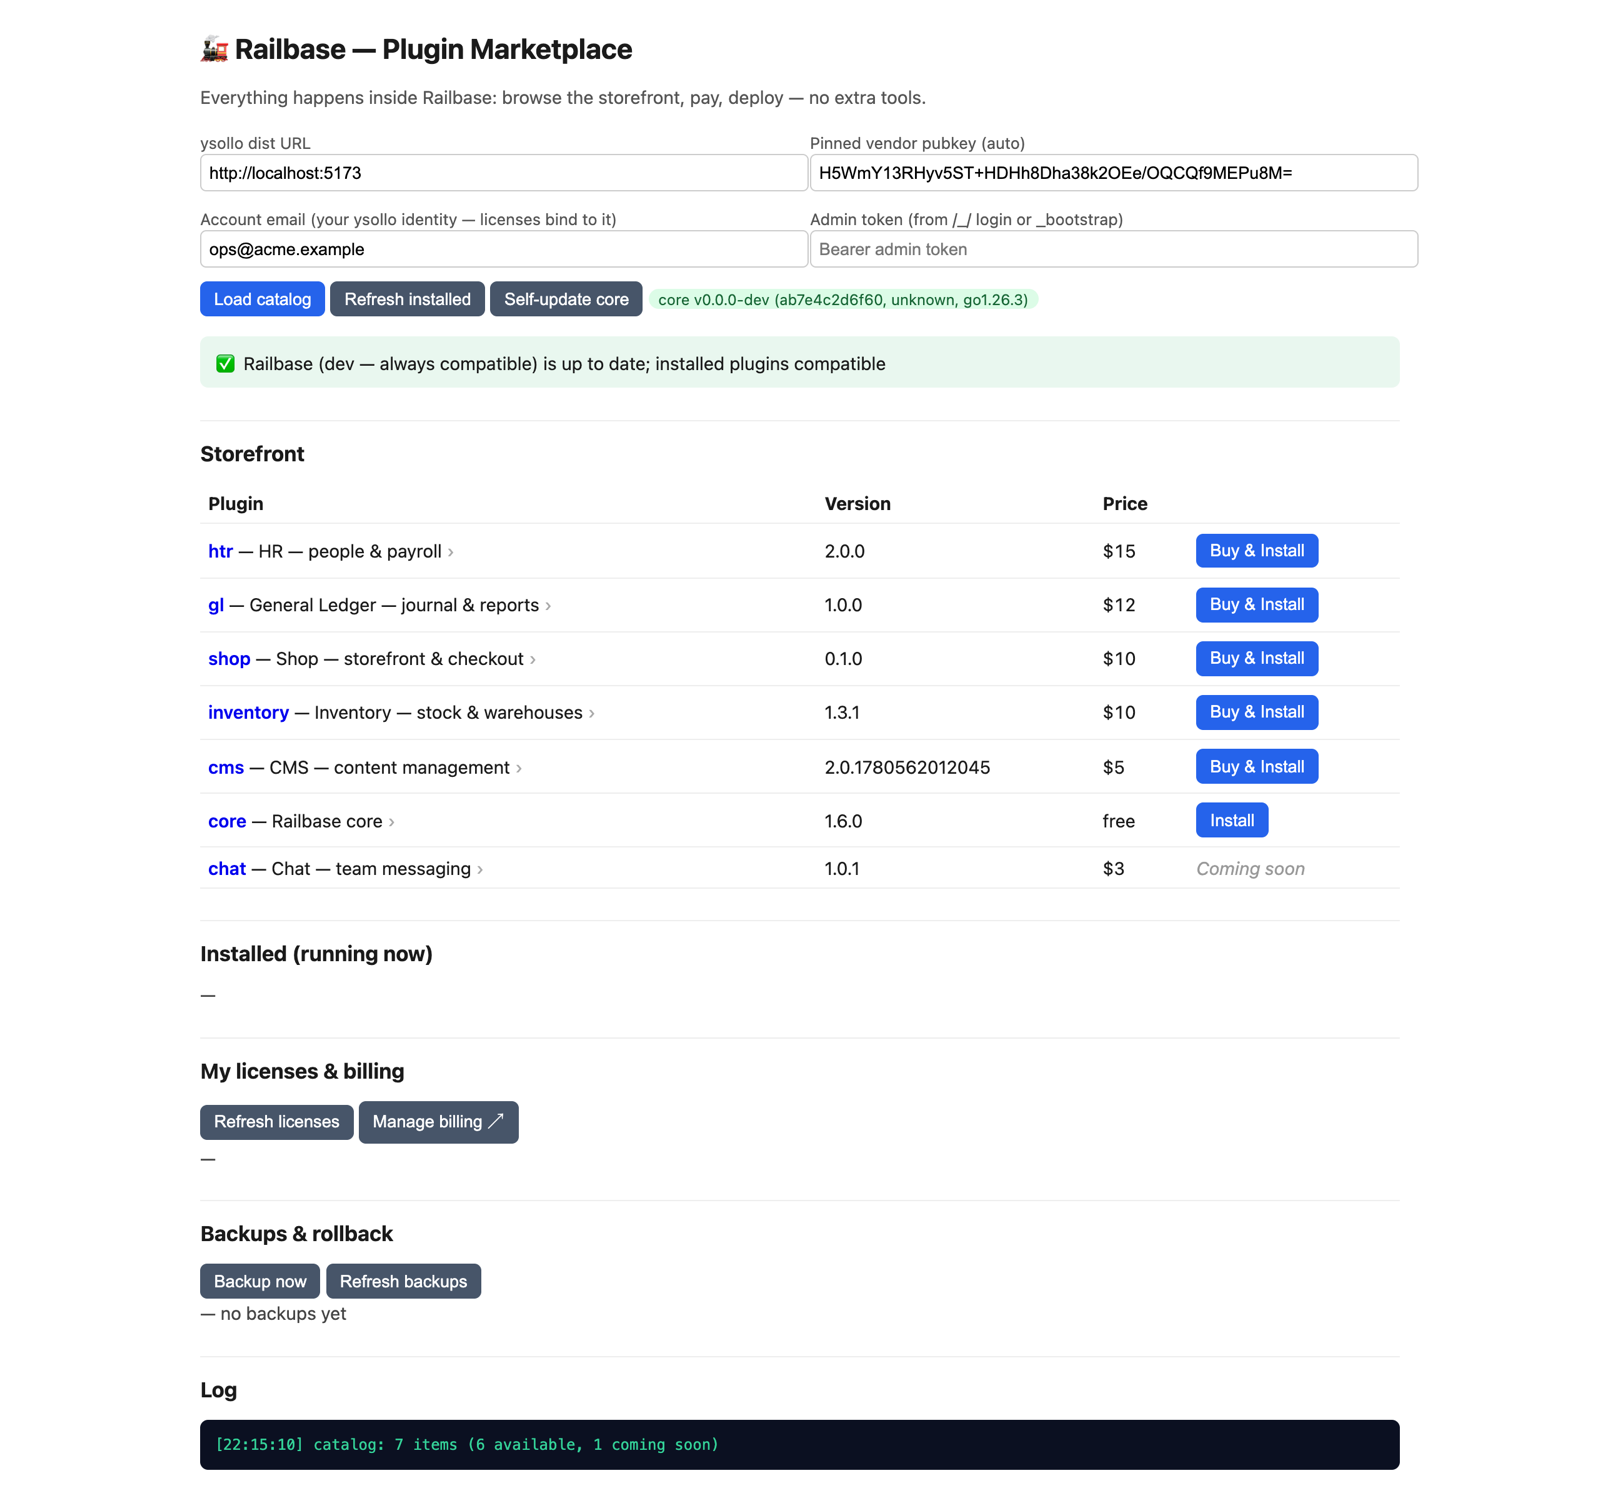
The marketplace
The marketplace is built in and always on. Open Marketplace in your Railbase admin and you're browsing the live catalogue from railbase.app — every plugin, its price, and its licensing terms. There's nothing to switch on and no address to configure; your binary already knows where to look, and it only ever pulls from railbase.app.
From the catalogue, getting a plugin is one continuous flow — you never leave Railbase:
- Pick a plugin and review its price and licensing terms — pricing varies by plugin (per-seat is the default, but some are flat per-company, per-host, or usage-based).
- Buy, or try it free.
- Buy — payment is embedded in the page. Every license is issued to a company/tenant, and that tenant is attested by your instance — not typed into the form (there is no individual/consumer option; every buyer is a company). If your instance has no tenant yet, buying is blocked until you seed one; with exactly one it's used automatically; with several you pick which. Any applicable tax is shown before you pay, and you enter your card in a secure form served by railbase.app. Your server is never a card processor and stores no card data.
- Try free — where a plugin offers a trial, this starts a time-boxed trial (one per plugin) that installs right away and needs no card, issued to the same attested tenant. A trial gets no grace period — it stops exactly at expiry — so buy before it ends to keep it running.
- Install. On a successful purchase or trial, your instance pulls the plugin, verifies it's authentic and unmodified before it runs, and brings it online.
Note
On a release build, marketplace actions — install, update, and even a free trial — are gated: the Core EULA must be accepted on the instance (a one-time clickwrap) and the buying account email must be verified, or the action is refused. You buy with that account email and your licenses are tied to it; use the same email on your account here.
Update
When a newer version is available the Marketplace shows it. Because a plugin is data-resident, an update re-lands the new signed bundle and remounts the runtime — reusing your existing license, so there's no second checkout. Core and plugin updates and the compatibility rules are covered in Updating.
Uninstall & purge
For marketplace-managed plugins, the plugin manager exposes two distinct removal actions — they are not the same (there is no separate "disable" step; a plugin without a valid license already goes dormant on its own):
| Action | What it does | Your data |
|---|---|---|
| Uninstall | Takes a backup, then removes the plugin (its _plugins row and runtime) |
The plugin's collections stay, dormant — reinstall restores it |
| Purge | Explicit, backup-gated, irreversible — removes the plugin's collections too | Deleted (backup taken first) |
Caution
Purge is irreversible. It takes a backup first and is gated behind that snapshot, but once purged the plugin's collections are gone. Purge is only valid for a still-installed plugin. Use Uninstall if you might reinstall later; Purge only when you're sure. See Backups & restore.
Where licenses are enforced
A marketplace plugin only runs while it holds a valid license. On a release
build, a paid plugin installs only with a valid license — without one it lands
dormant (inert) rather than running unpaid, and activates the moment a valid
license binds. Your instance re-checks each bound license against railbase.app on
a heartbeat, so a renewal flows in with no action from you. That heartbeat also
carries this machine's hardware fingerprint: licenses are node-locked, so
moving one to a new or changed machine needs a re-activation (a token fetch for an
unrecognized node returns activation_required). If a license lapses past its
grace window — or a payment is refunded or charged back, which revokes
immediately — the plugin goes dormant: its code is no longer decrypted or run
and its data is preserved, until the license is restored. Renew or reinstate
before the grace window closes to avoid the interruption — see
Licensing & seats and Managing billing.